Share This Page
| Home | | Drones | | | | Share This Page |
 Creating Drone Images and Panoramas
A tutorial on drone-platform photographic techniques
Copyright © 2015, Paul Lutus — Message Page
Most recent update: 09.04.2015
(double-click any word to see its definition)
Quadcopters, and drones in general, are a terrific source of photographic and video material. Another recent technological advance, Panoramic photography, represent a powerful visual presentation method. By using quadcopter footage to produce what are called "photospheres", we can create a compelling new way to present natural environments.
The term "photosphere" once referred to a star's transparent atmosphere (outside the opaque plasma zone), but now the term may also refer to a three-dimensional photographic panorama, a wide-field virtual image with a way to navigate through its content, encompassing three dimensions. This means a viewer is free to move horizontally and vertically from a viewing position inside a virtual spherical surface.
Because many of these concepts are new, it might be wise to classify images as:
- Images of the First Kind: flat rectangular photographs.
- Images of the Second Kind: horizontally extended images served by a computer, often with a field of view wide enough to require a special viewer, and sometimes encompassing a continuous circle of 360 degrees.
- Images of the Third Kind: called "photospheres," images like the above but that extend vertically as well, so the viewer is located within a virtual three-dimensional sphere of imagery.
- Images of the Fourth Kind: "aerial photospheres", that is to say, photospheres taken from a drone that's been positioned in three dimensions to maximize the beauty or usefulness of the image.
It is to the third and fourth categories that the term "photosphere" applies. A photosphere is a full, virtual spherical surface of imagery, and the viewer is located inside the sphere, able to adjust the view both vertically and horizontally through 360 degrees.
This article explains how to use a quadcopter to create a photosphere, an image of the Fourth Kind, at a location and altitude of the creator's choosing.
For instructions about how to acquire and learn to fly a quadcopter, I refer readers to my quadcopter article. From this point forward, I will assume the reader knows how to position a quadcopter at a three-dimensional location of his choosing.
Here are the main points to understand in acquiring photosphere image data:
- A typical modern quadcopter has a first-person-view (FPV) feature, which allows the operator to see what the quadcopter's camera is seeing, an essential feature for collecting photosphere data.
- The raw materials for a photosphere are many overlapping still images, the more the better.
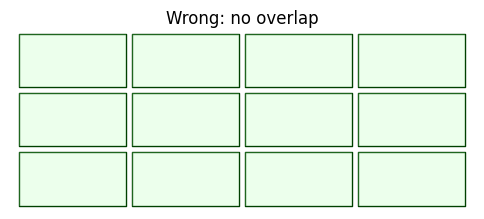
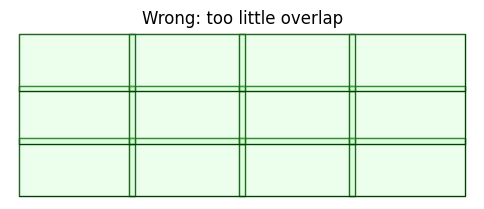
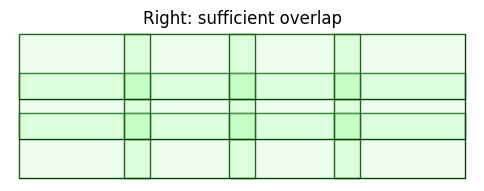
- For a later process called "image stitching", the images must overlap — images along a row must overlap horizontally, and successive rows must also overlap vertically (see Figure 1 below).
- A brief terminological digression: horizontally rotating a quadcopter's camera is called "yawing" (the craft) or "panning" (the camera), vertically rotating is called "pitching".
- The easiest and most efficient way to collect image data is to record high-resolution continuous video data while rotating the quadcopter horizonally (i.e. "panning") and vertically ("pitching"), then later extract many still images from the video stream.
- For more detail, to produce enough data for a photosphere, the quadcopter operator should pan a full horizontal circle, then change the camera's pitch (vertical position), then pan another full circle, so over time an entire hemisphere of data is acquired.
- Ideally, a full sphere of image data would be acquired, but because many quadcopters cannot point their cameras above the horizon, only a bit more than a hemisphere is possible.
- A complete data set can be acquired by first pointing the camera at the horizon or above (highest pitch), panning a full circle, then pitching down so the new circle overlaps with the circle above it and repeating a complete horizontal pan, continuing the process until the camera is pointed straight down.
- An example of this overlapping technique can be see in this video, between times 01:17 and 01:52, except that I didn't start the sequence by pointing at the horizon, also it was too windy to produce useful data (too much quadcopter and camera motion).
- A successful photosphere requires that all the image data be collected from a single position in a short period of time, a task for which a GPS-stabilized quadcopter is ideally suited.
- Some advice: don't try to combine data from different positions or even different days at the same position, and choose a day with little or no wind (this gives the quadcopter a chance to remain stationary in a user-selected 3D GPS position).
Here's a step-by-step procedure for creating a photosphere:
- To prepare the quadcopter's camera, and to avoid serious problems during later image processing, select a particular white balance setting (avoid automatic white balance), and select a specific fixed ISO value and shutter speed, in other words don't let the camera change its exposure settings from frame to frame. These precautions assure that all the images have a uniform exposure and white balance, essential to avoid noticeable discontinuities between stitched images in the final photosphere.
- More about the camera's ISO setting, if one is available — to avoid excessive image noise, use the smallest practical setting consistent with available light. Too high a setting causes image noise, too low a setting can cause image blurring at times with little available light. On a bright, sunlit day, for best results use the lowest practical numerical value.
- Choose a location with interesting views, a location where you're allowed to fly and without being disturbed.
- Ideally on a windless day, but in any case in wind velocities below 20 MPH (32 KPH), locate the quadcopter at a position and altitude that maximizes the value of the imagery. Choose an altitude carefully — too high an altitude may cause three-dimensional objects to lose their perspective depth, too low an altitude may cause interesting distant objects to be obscured by nearby objects.
- Perform the procedure described earlier — collect a lot of video data, organized in overlapping rows, from the highest camera pitch to the lowest. Make sure to gather some data with the camera pointed straight down, otherwise there will be a gap in the photosphere's data. During the image collection phase, don't allow the quadcopter to move — keep it as steady as practical.
- It cannot be overemphasized that a stationary drone is important for image quality, but over time, even on a perfectly windless day, the drone may recalculate its GPS position and move during recording, so it's desirable to record a full image set in the shortest possible time interval.
- After the video recording phase, use any of several methods to extract many overlapping still images from the video. Some video viewers allow images to be manually captured from the stream — this is a good way to fine-tune the degree to which successive images overlap. Other methods can be used to automatically extract images from a video stream at set time intervals.
- Remember this cardinal rule: all the images in the set must overlap with others in the set — a high degree of overlap increases their usefulness in the stitching process:
Figure 1 : How to overlap images
- After a grid of images has been organized, it's time to apply a program able to stitch images together and create a properly formatted photosphere file. On the Linux platform, I've been using Hugin Panorama Creator, a free, open-source program that created the photosphere examples below, and one that's installed by default in recent Ubuntu distributions. It turns out that Hugin is available for Windows as well as Linux, so I can recommend the program without worrying that I might seem to be demanding that everyone install Linux (even though that's a good idea™).
- Using Hugin Panorama Creator on Linux, I make sure my system has adequate RAM and hard drive space, and select the easiest workflow options (simple interface). I load my images, specify the camera's field of view and focal length (in some cases not so easy and a subject of much experimentation), "align" the images, then create a panorama, in a somewhat tricky three-step process. The Hugin program is intelligent enough to figure out the most logical output format on its own and produces a TIFF-formatted photosphere graphic file containing the all-important XMP data block (describing the photosphere's properties) alongside the usual EXIF data (users may elect to use JPEG images rather than TIFF as the output format).
- The best results are obtained from footage taken on windless days, and of distinctive landscapes, landscapes that vary in color and shape from place to place, which gives Hugin enough variety to put the images in the right order. Less satisfactory results are obtained with pictures of unvarying subjects like bodies of water or uniformly colored tree cover.
Having created a photosphere file, one has a number of display options. There are many Android-platform programs that can display and navigate photospheres, my favorite at the moment is QuickPic. For Web page display, the options are fewer and more difficult to implement, but there are some open-source JavaScript photosphere viewers, including one I chose as a starting point (Photo-Sphere-Viewer) and customized.
Note: if you have a choice about which browser you use to view photospheres, my advice is to choose any browser other than Microsoft Internet Explorer. In my tests while developing this technology, Microsoft's browser has put in the worst performance of the available alternatives. Google Chrome and Mozilla Firefox are both much better choices.
Important: Below you will find a small selection of example aerial photosphere images. For a much larger collection of photospheres from Alaska, Canada and Washington State, be sure to visit my Photosphere Gallery page.
Photosphere viewer instructions: Use your mouse to navigate the image below. Drag your mouse to pan around the image, and use your mouse wheel to change magnification (on touch screens, use two fingers to zoom in and out). Notice the full-screen control at the lower right.
Image Notes:
So far, the photospheres I've created have come out well, and to me they represent an obvious aesthetic and practical application of drone technology. I need to learn more about the Hugin image processing program — it's rather complicated, and because of my limited experience, it doesn't always produce the nice results seen above.
I plan to create more quadcopter photospheres, a project that depends on the supply of visually interesting locations where I have permission to fly and record video.
| Home | | Drones | | | | Share This Page |