
 Share This Page
| Home | | Climbing | | | Share This Page |
Use a drone to rig a climbing line
— P. Lutus — Message Page —
Copyright © 2021, P. Lutus
Most recent update:
(double-click any word to see its definition)
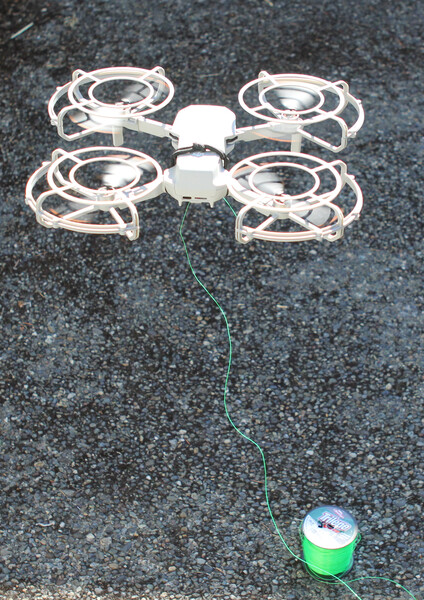 Figure 1: Drone lifting a light line
NOTE 1: This article is not a tutorial, it is an exhibition. Before engaging in the kinds of climbing activities shown here, seek training from a professional.
NOTE 2: If you have a commercial interest in line rigging using a drone, be sure to read the "Legal Issues" section of this article (about FAA certification for drone pilots).
Backstory
There's a tall tree in my yard — 145 feet (about 44 meters). For some time I've wanted to climb it but didn't see a way to rig a line high enough to make it interesting. Finally I realized I could use a drone to fly a light line up as high as I wanted, then use the light line to draw up a heavier line, and evenually a full-size climbing line. This article explains how it's done.
Traditional Methods
Conventional rigging methods include:
- Hand-throwing a weighted light line over the destination.
- Using a hand slingshot.
- Using a giant pole slingshot.
- Using a repurposed hunting crossbow.
- Ascending using old-style climbing methods (i.e. spurs and strap) while carrying a light line.
- Others.
New Approach
This article's quadcopter method has more steps than these earlier methods, but it allows much higher line placement and better control over routing. The key to this method is a small GPS- and camera-equipped drone for the initial ascent. The drone carries a light monofilament nylon fishing line and maneuvers through the destination zone, following the desired climbing line layout.
The next article section gives the gory details, but here's an outline:
- Stage I:
- Attach a light monofilament nylon fishing line to a small GPS-plus-camera drone, preferably one equipped with propeller guards (Figure 1).
- Fly the drone up to the destination and, using a first-person view (FPV), deal with any obstacles or special route requirements.
- Fly the drone back to the surface — the fishing line should now be looped through the destination.
- Stage II:
- In this stage a 3mm (Type II) parachute cord replaces the fishing line.
- Splice the fishing line onto the parachute cord (Figure 5 below).
- Use the fishing line to raise the parachute cord through the destination and down again.
- Stage III:
- In this stage a full-size climbing line replaces the parachute cord.
- Splice the parachute cord onto the climbing line (Figure 6 below).
- Use the parachute cord to raise the climbing line through the destination and down again.
- Stage IV:
- Secure the climbing line, gear up, climb.
Using this method we rig a light fishing line, easily lofted by a small drone and able to stand a load of only ten kilograms (22 pounds), proceed through three stages, and conclude with a properly rigged, human-rated climbing line able to bear over 3,000 kilograms (about 6,600 pounds).
For reasons given in the next section and for any significant height, all three rigging stages are required.
For this method to succeed, some advance planning and analysis is desirable. Consider that each of the three lines in this method must be supportable by the prior step, must bear the weight required by the following step, and must deal with any friction created by the round-trip route. For any planned target height:
- The drone must be able to support the weight of the monofilament line through a full ascent to the target site and descent to the ground, including any friction created at the target site and from other sources.
- The monofilament line must then be able to support the weight of the parachute cord over the same route, again including any friction along the route.
- The parachute cord must be able to support the weight of the climbing line over a round trip from the ground to the target site including friction, and back to the ground again.
These issues mean choosing the three lines can't be arbitrary and some choices won't work. But two of the choices are normally fixed, predetermined: the carrying capacity of the drone that lofts the lightest line, and the properties of the human-rated climbing line.
My Project Target
As I said above this project's evaluation target was a 145 foot (about 44 meter) conifer in my yard I had always wanted to climb, but until this project I hadn't thought of a safe and practical way to rig a climbing line.
After some preliminary drone surveys of the area near the top of the tree, I decided the trunk was thick enough at 130 feet (about 40 meters) to bear my weight, but for adequate anchor strength I realized I would need to wrap the climbing line around the tree's trunk, not just drape it over a limb as is normally done — at 130 feet, individual limb sizes looked too small to inspire confidence.
Once I realized I needed to wrap my line around the tree's trunk, it came to me that none of the conventional line lofting methods could be used. To be able to wrap the tree's trunk, I needed a way to fly up to the target height with a light line, fly completely around the tree, then descend along the original ascent path. One can't do that with a slingshot — or a crossbow.
Drone weight bearing capacity
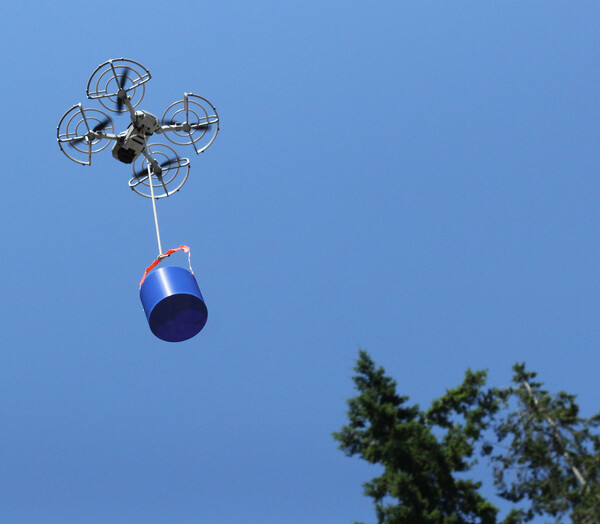 Figure 2: Testing my drone's load limit
To choose the first, lightest line, I needed to know how much weight my DJI Mini 2 drone could lift. I rigged a test container and added small weights until the drone refused to leave the ground. After some tuning I decided the drone could lift about 8 imperial ounces (roughly 227 grams), but not for a very long flight time and not without complaining and behaving erratically.
On that basis I chose a very light monofilament fishing line with a breaking strength of 25 pounds (roughly 11 kilos) but that weighs very little, so the drone could raise the line to a substantial height while behaving more or less normally.
Prop Guard Issue
If possible, use a drone with prop guards (the circular cages around the props seen in Figure 2), for two reasons:
- The guards keep the props from getting tangled up in the tree's branches, leaves or needles while flying up to and returning from the target zone.
- They keep the props from being fouled by the fishing line, which would certainly disable the drone, and not necessarily in a way that would allow the drone to return to the ground and be recovered.
Avoid Vertical Descent
On that topic, while flying a drone that's towing a fishing line, don't descend straight down at any significant speed. The reason may not be obvious — the monofilament line is so light that it won't necessarily descend as quickly as the drone, so in a rapid descent the drone may overtake the line, which will get tangled in the drone's props and the craft will then drop like a stone. To avoid this, always fly laterally while descending, and avoid descending too quickly.
Drone Preparation
To anchor the fishing line, the drone should be equipped with an elastic shock cord — a short length of flexible cord tied to the drone as shown:

Figure 3: Drone attachment detail, bottom view
(click image for full-size)
Figure 4: Drone overview (click image for full-size)
Fishing line to Parachute Cord
Once the fishing line has been successfully looped over the target site, splice the fishing line to the parachute cord. Do this carefully, assuring that the chosen splice method is secure (meaning the fishing line would break before the knot would unravel). Figure 5 below shows an example splice using two repetitions of a version of the "Scaffold knot" to assure that the monofilament line won't disconnect under load.

Figure 5: Splice — Fishing line to Parachute Cord
(Click image for full size)Notice about this splice that care has been taken to avoid a dangling line end that could snag on obstacles as the parachute cord replaces the fishing line along the route.
Having prepared the splice, use the fishing line to draw the parachute cord through the entire route.
Parachute Cord to Climbing Line
This final phase uses the same setup and knots as the prior phase, just scaled up. As before, the parachute cord is securely anchored to the climbing line using a version of the Scaffold knot:

Figure 6: Splice — Parachute Cord to Climbing Line
(Click image for full size)As before, care is taken to avoid a dangling line end that would snag on obstacles as the climbing line replaces the parachute cord.
Stuck at 130 feet (40 meters)
In my actual field tests, because of the complexity of the line routing (i.e. looping around the tree's trunk at 130 feet) and in spite of the careful line splice method shown above, this phase turned out to be more difficult than expected. As I raised the climbing line using the parachute cord, the line got stuck as it passed around the tree trunk and no amount of force could get it moving again.
I solved this problem by returning the splice to the ground, wrapping the splice in duct tape (which has a slippery outer surface), then pouring liberal amounts of liquid soap over the duct tape:

Figure 7: Splice covered with Duct Tape, Liquid Soap
(Click image for full size)These changes allowed the climbing line to pass around the tree trunk, in spite of the high loads on both sides of the high-friction area (a 130 foot length of typical 11mm climbing line weighs seven pounds or about 3 kilos).
Success
Here are views of the target tree after the climbing line was successfully installed:

Figure 8: Treetop View from Surface
(Click image for full size)
Figure 9: Treetop View from 130 feet (40 meters)
(Click image for full size)
To be sure I wouldn't break lines or crash my drone, I created this table to help choose the lines used in this rigging method:
Line Type 0.48 mm
monofilament fishing line3 mm
parachute cord11 mm
static climbing lineBreaking Strength kilonewtons 0.1110 1.6000 33.3000 Breaking strength kilograms 11.3188 163.1546 3395.6543 Breaking strength pounds 24.9538 359.6938 7486.1274 Weight grams / meter 0.2318 6.7000 84.0000 Weight meters / gram 4.3141 0.1493 0.0119 Weight meters / kilogram 4314.0638 149.2537 11.9048 Weight kilograms / meter 0.00023 0.00670 0.08400 Weight pounds / foot 0.00016 0.00450 0.05645 Weight feet / pound 6420.0340 222.1140 17.7162 Weight pounds / kilos * 130 feet (40 meters) 0.0202 / 0.0092 0.5853 / 0.2655 7.3379 / 3.3284 Weight pounds / kilos * 500 feet (152 meters) 0.0779 / 0.0353 2.2511 / 1.0211 28.227 / 12.8016 Using the table's figures, here's a step by step analysis:
- The monofilament fishing line is very light, and if reasonable care is taken with tangles and excessive friction, the DJI Mini 2 drone should be able to lift and maneuver this line through any reasonable target location.
- With a breaking strength of over 11 kilograms, the fishing line should bear the weight of the parachute cord up to the required height.
- With a breaking strength of 163 kilograms, the parachute cord should bear the weight of the climbing line up to the required height.
- With a breaking strength of about 3400 kilograms, the climbing line should support a human climber.
In the U.S. and most other countries, laws governing drone use are changing rapidly. With particular focus on a project like this, at the time of writing (June 2021) it turns out that in the U.S., if you plan to fly a drone as part of a commercial or profitable activity, you must acquire a Part 107 certification.
Even though the drone used in this example has a mass less than 250 grams and therefore doesn't need to be registered, the certification requirement remains — the only issue is whether the activity is commercial or profitable in nature. If it is, the operator must have a Part 107 certification.
In practice this means if a drone is used to rig a line as part of commercial tree or other kind of work, the drone operator must be Part 107 certified.
Because of the ready availability of strong, lightweight lines, and with a little advance planning, this is an obvious application for a small, modern camera drone. I expect to see this method applied more often in the future, especially in difficult rigging environments where great height and/or poor visibility prevent traditional methods from working.
Thanks for reading!
| Home | | Climbing | | | Share This Page |


